
From Zero to a Dockerized Development Environment in Minutes with GitHub Repository Templates
An effective approach for setting up a development environment

I don’t remember the last time I wrote code outside a container. I won’t lie—Docker has a steep learning curve. I still remember the painful days of debugging missing dependencies while trying to build my first images. But once you move past the crawl phase, containers really shine—especially when you’re shipping code to a remote server or the cloud (a.k.a production).
This tutorial focuses on efficiency in setting up a new Dockerized development environment with minimal time using GitHub repository templates with VScode and the Dev Containers extension.

📌 Are you a Medium subscriber? Please support this newsletter and read it on Medium. :)
♻️ Find it useful? Please share it with others!
If you want to learn more about setting up a Dockerized development environment with the Dev Containers extension, please check out my tutorials for Python and R.
GitHub Repository Template
Before we dive into the structure of a Dockerized template, let’s review what a GitHub template is and how to set one up.
A GitHub repository template is a great feature that enables us to set a repository as a template and reuse it as a baseline to create new repositories. The motivation for using templates is clear: reduce the starting cost (i.e., time and effort) of a new project when repeatedly using the same repository structure. In addition, it allows you to have consistency of your settings (theme, fonts, CLI tools, etc.) across your projects.
For example, I am using Python and R, and I have a dedicated template for each language:
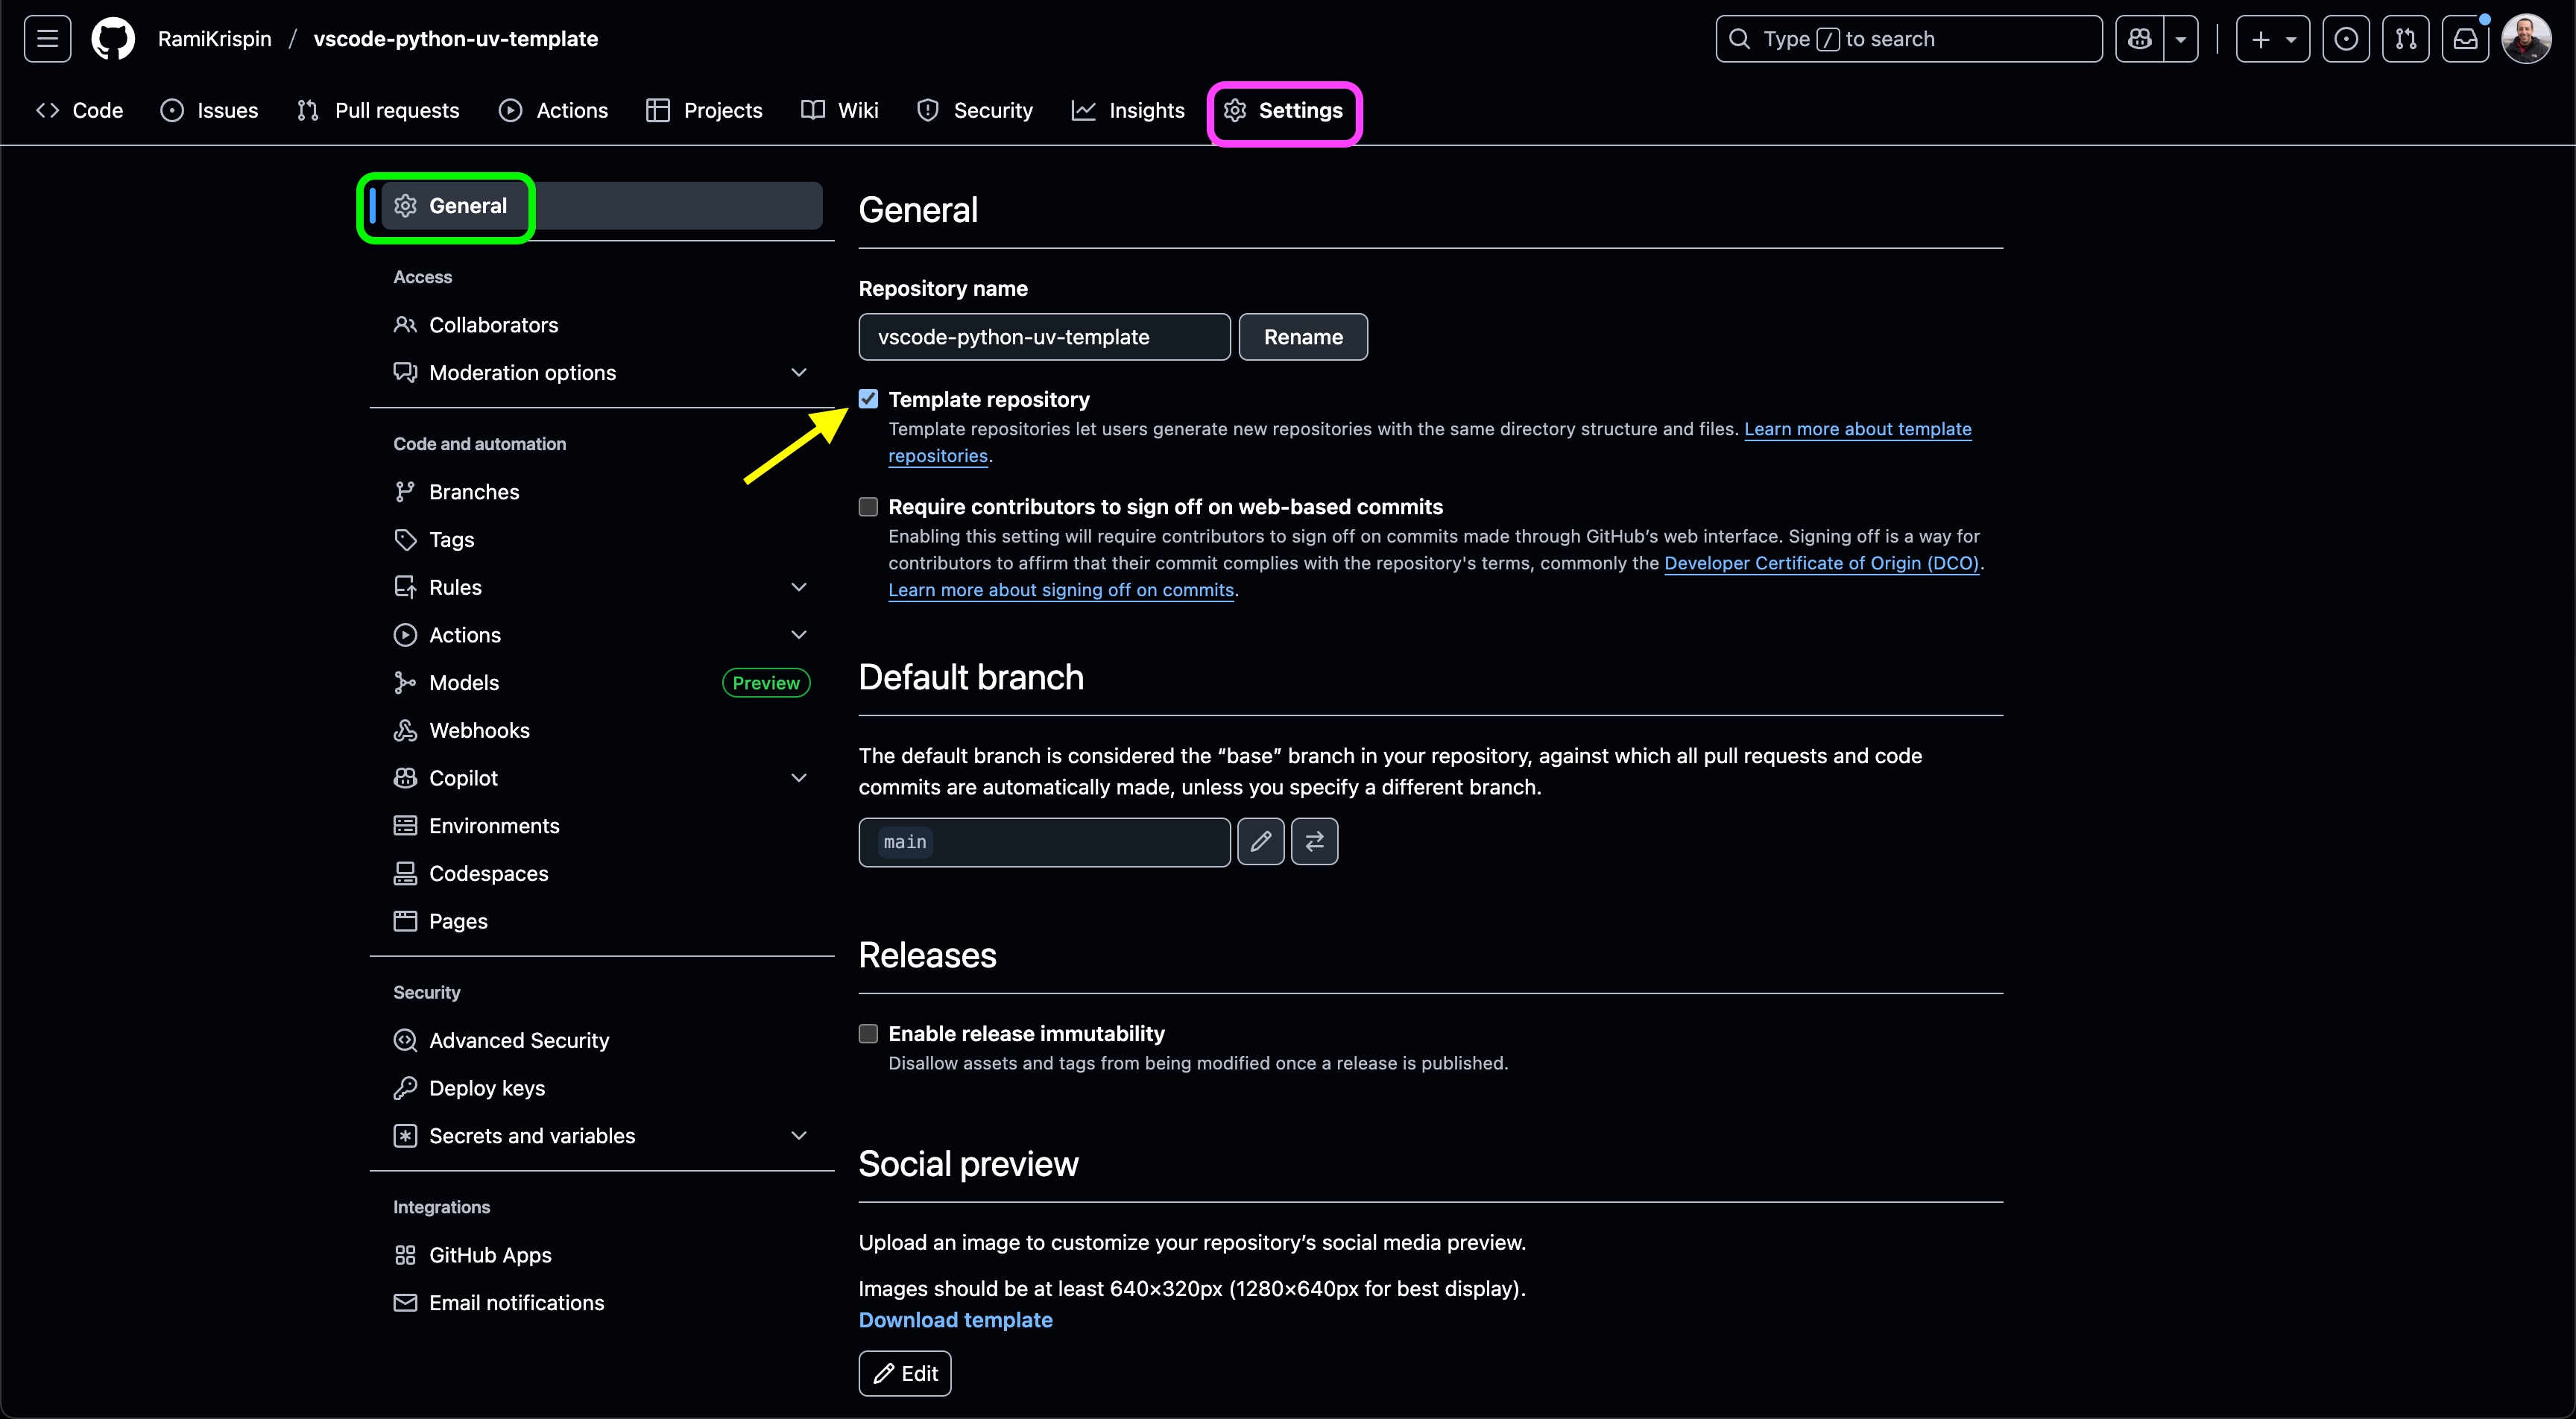
You can turn any repository into a GitHub template with the following steps:
Go to the Settings tab (marked in purple)
Select General on the left menu (green), and
Click on the Template repository checkbox (yellow arrow)
This will add the Use this template green button on the top right side (marked in purple):
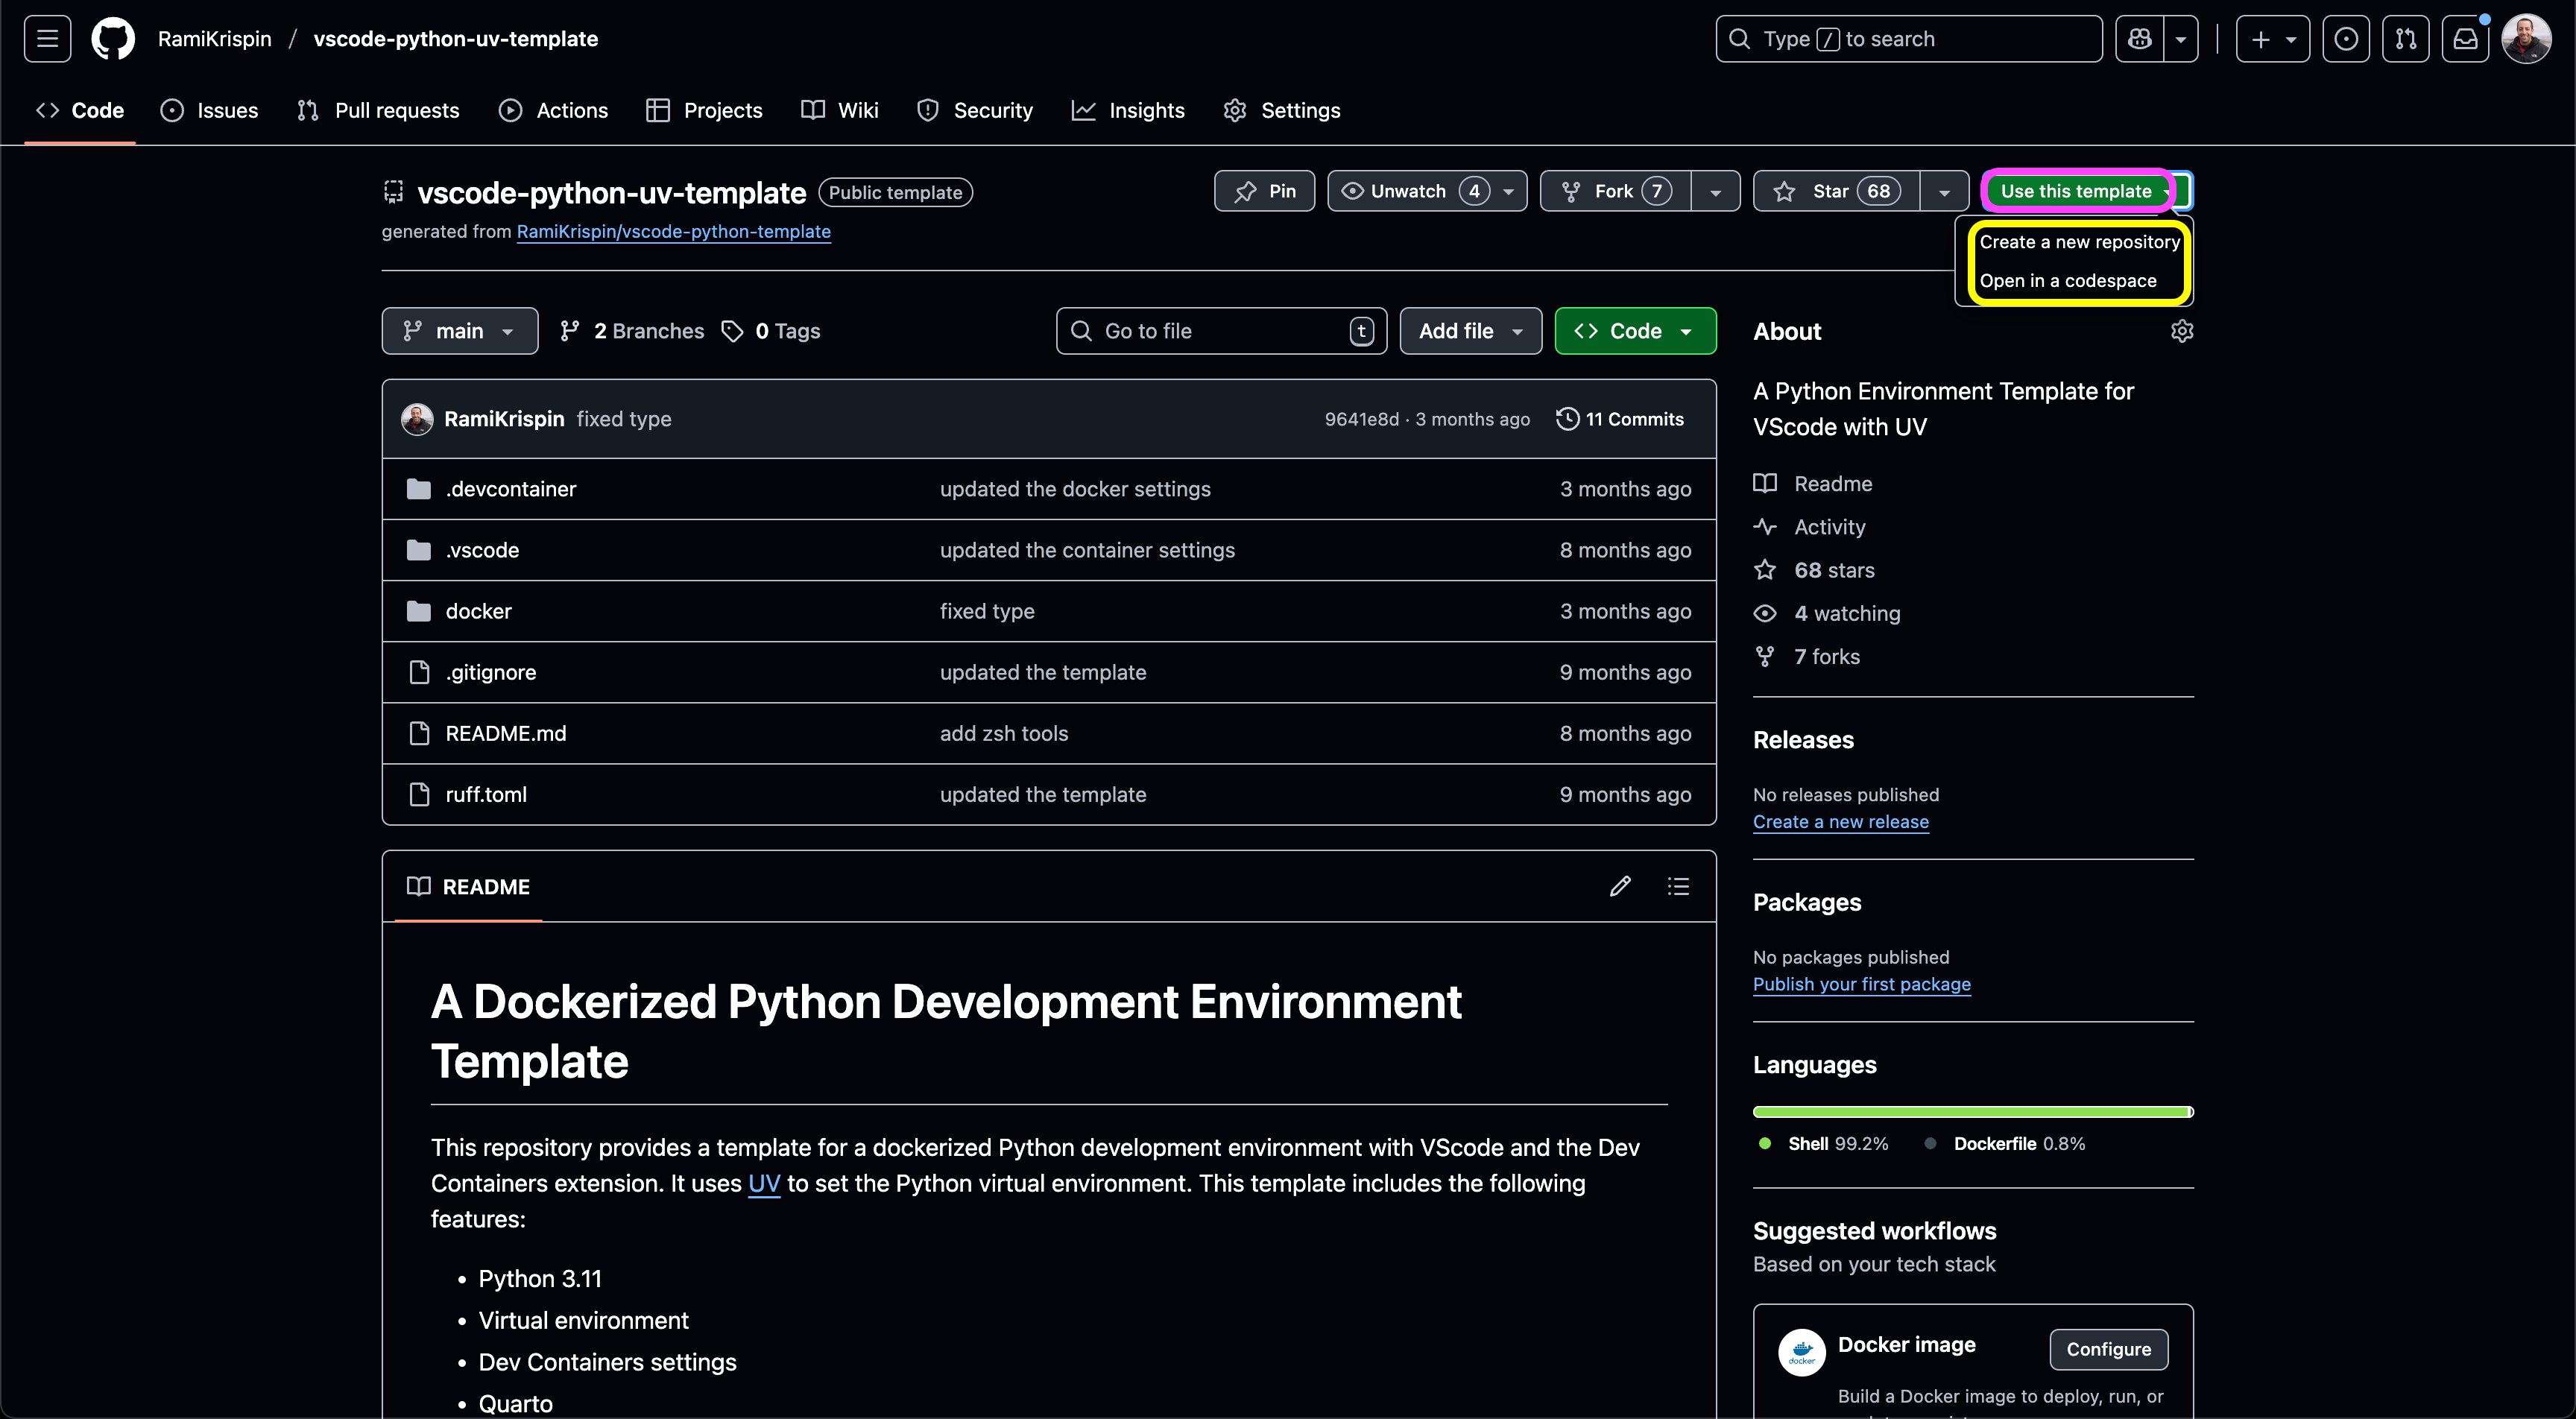
When clicking this button, it pops up the following options:
Create a new repository using this template, or
Open the template on Codespace
We will focus on the first option.
A Dockerized Development Environment Template
Building a Dockerized development environment could be time-consuming, especially if you are like me, starting the build from a plain Ubuntu image. The goal of using a template is to reduce the starting cost (i.e., time and effort) of a new project by having the backbone project settings files ready to use and modified, as well as taking advantage of the Docker caching layers feature.
Should I Cache or Should I Not?
Let’s say you want to set up a general Dockerized development environment template for Python. The first thing you should consider is what the common features are that you will use in most scenarios, and what the ones that are project-dependent are. If you are familiar with the Docker caching method, the settings of the image layers in your Dockerfile do matter. To understand this better, let’s review the following Python Dockerized development template:
https://github.com/RamiKrispin/vscode-python-uv-template
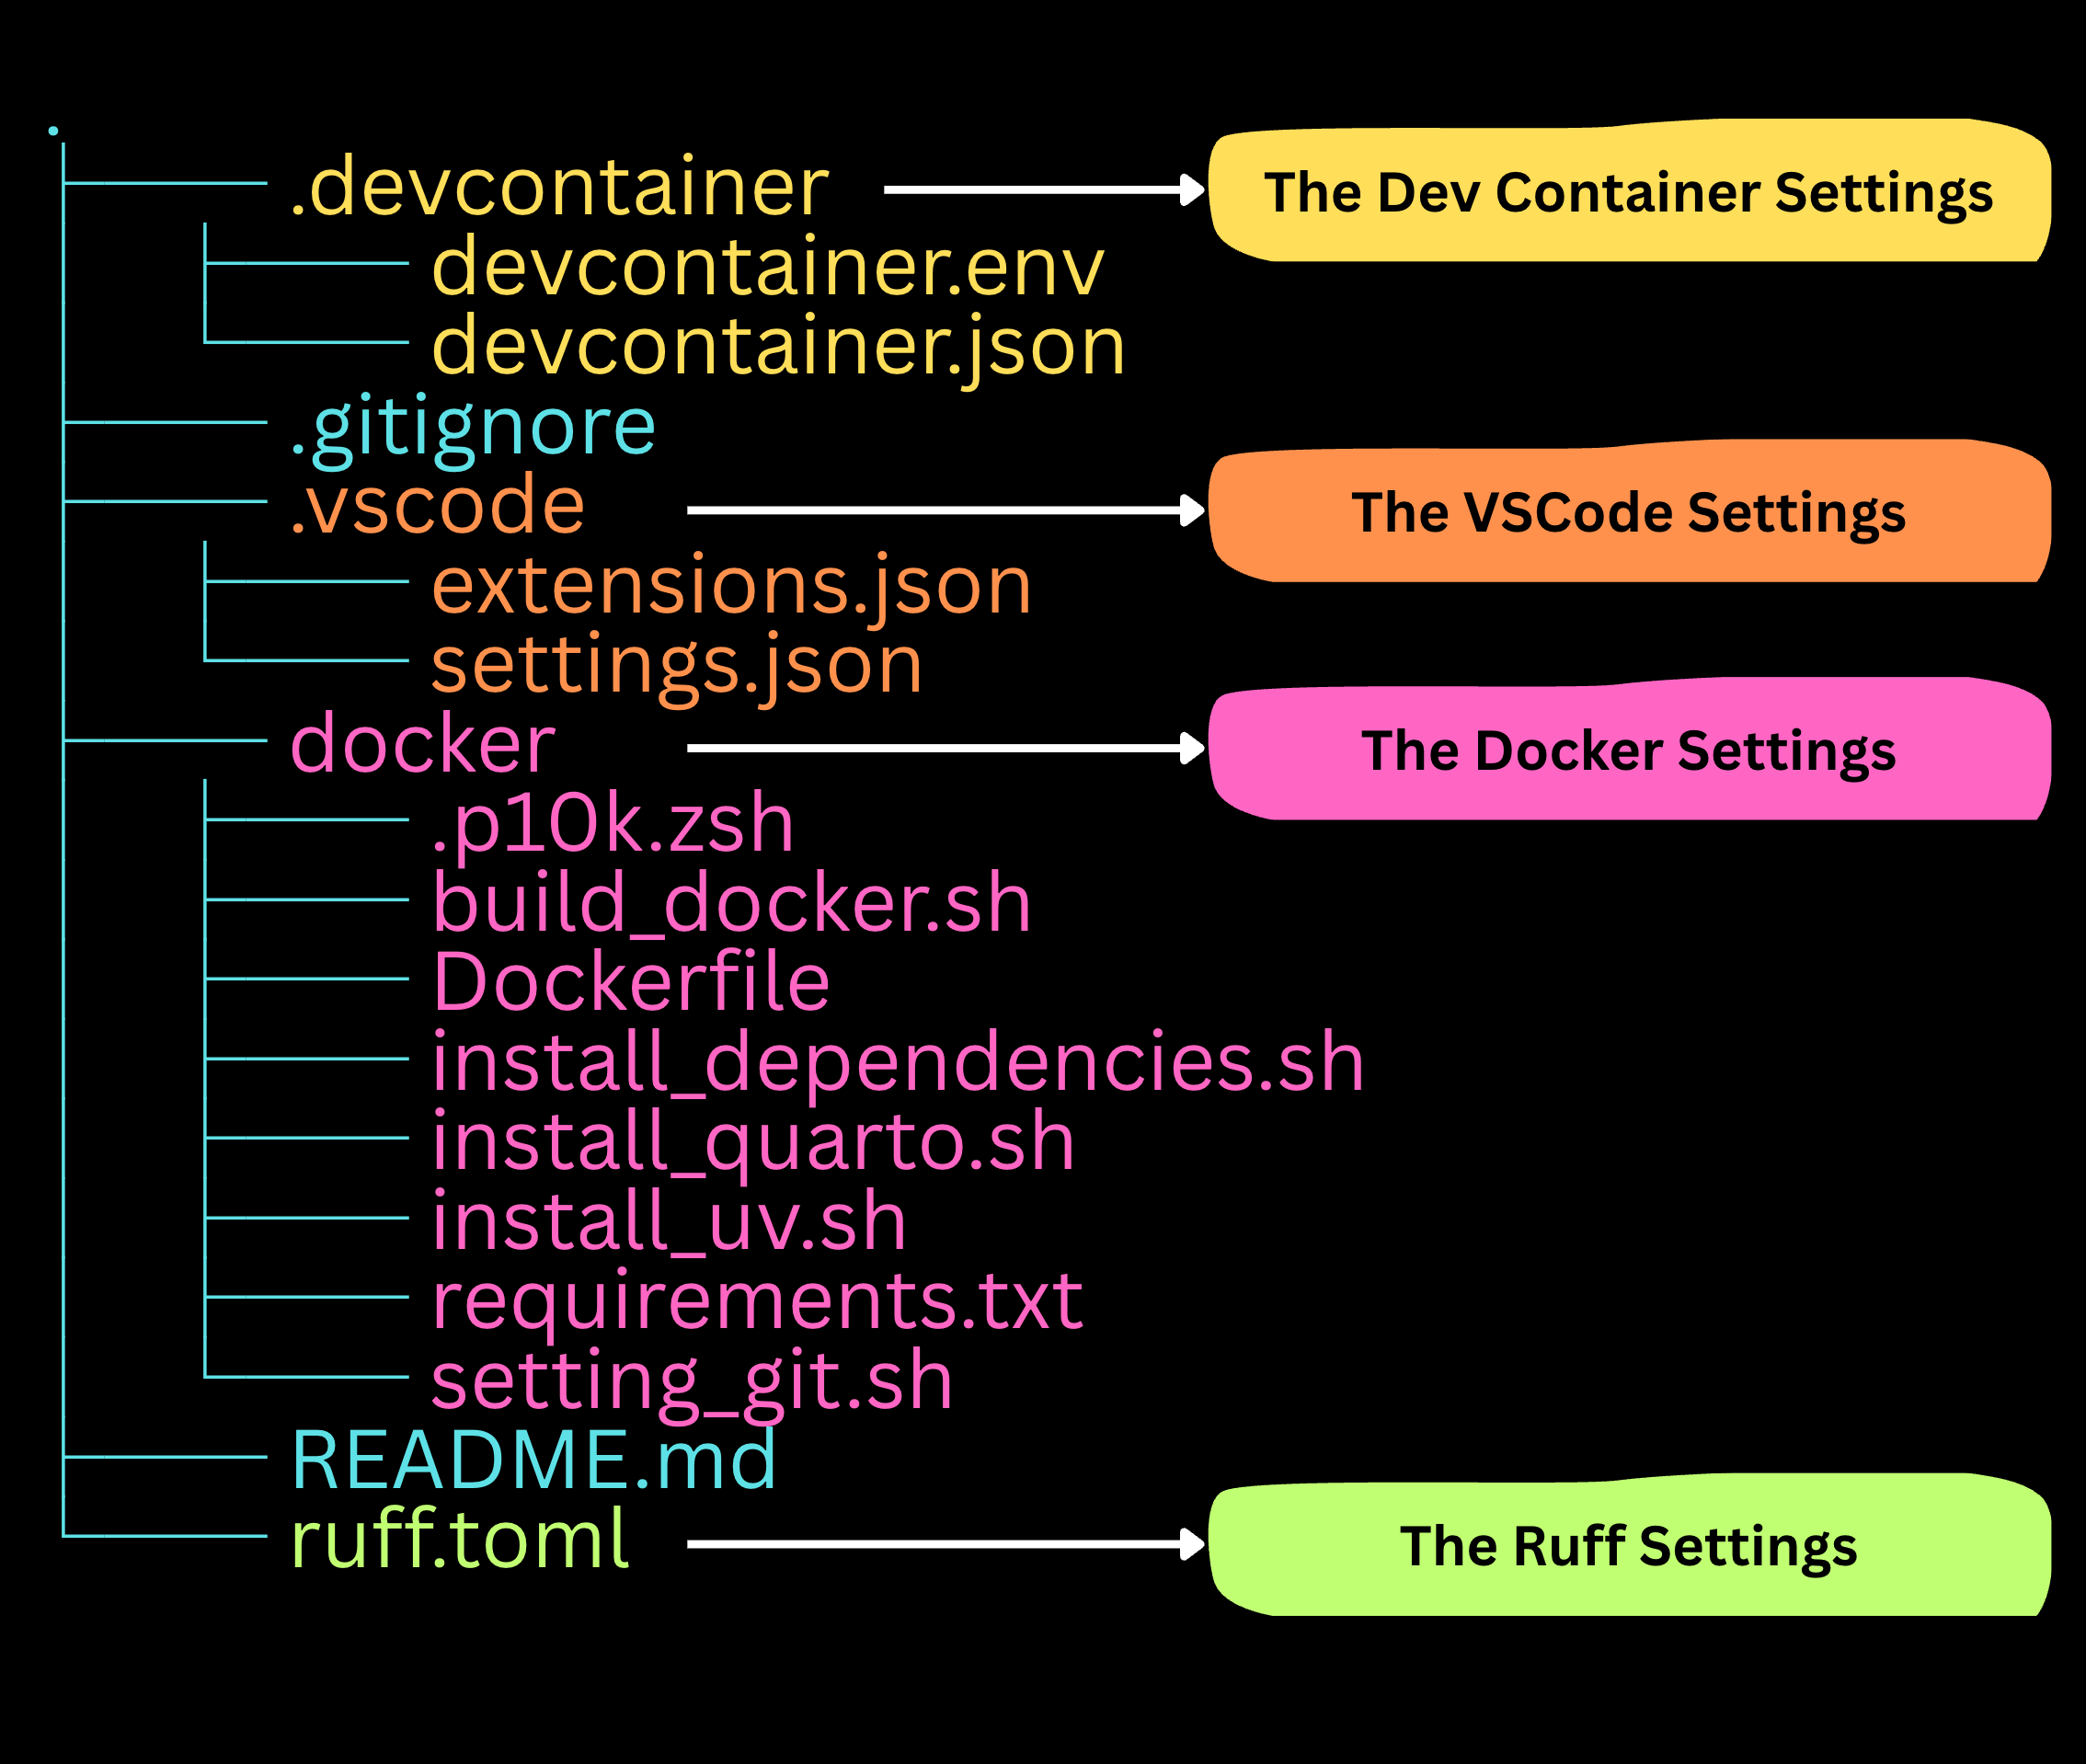
This template has the following features:
Dev Containers and VScode settings
Docker settings
CLI tools - zsh, on-my-zsh, syntax highlighting, etc.
Sync with my local settings (e.g., bash history, etc.)
UV package manager
Quarto
Python virtual environment with a requirements.txt file
The docker folder (marked in purple below) includes the Dockerfile and the supporting bash scripts used during the build time:
When using this template, the only components required to update are the list of libraries in the requirements.txt file according to the project requirements. Therefore, the setting of the Python virtual environment should be the last layer in the Dockerfile:
FROM ubuntu:22.04

# Arguments
ARG PYTHON_VER="3.11"
ARG QUARTO_VER="1.7.32"
ARG VENV_NAME="my_project"
ARG RUFF_VER="0.12.0"

# Environment variables
ENV VENV_NAME=$VENV_NAME
ENV PYTHON_VER=$PYTHON_VER
ENV QUARTO_VER=$QUARTO_VER
ENV RUFF_VER=$RUFF_VER

# Copy files
RUN mkdir settings
COPY install_quarto.sh install_dependencies.sh install_uv.sh  setting_git.sh settings/
# Install dependencies and set zsh
RUN bash ./settings/install_dependencies.sh
# Install Quarto
RUN bash ./settings/install_quarto.sh $QUARTO_VER

# Set Python environment
COPY requirements.txt settings/
RUN bash ./settings/install_uv.sh $VENV_NAME $PYTHON_VER $RUFF_VER
RUN SNIPPET="export PROMPT_COMMAND='history -a' && export HISTFILE=/root/.zsh_history && export HISTIGNORE='ls'" \
    && echo "export HISTFILESIZE=1000" >> "/root/.bashrc"\
    && echo "$SNIPPET" >> "/root/.zshrc"
Leveraging the cached layers along with the phenomenal speed of UV, setting a new Dockerized Python development environment is a matter of seconds to a few minutes of effort.
Starting a New Project
Let’s now connect the dots and see how to leverage this template to start a new project.
Here is a typical example of my process - setting a development environment for a forecasting project that involves the following tools:
Nixtla forecasting framework
MLflow to track the model training process
Pandas to process the data
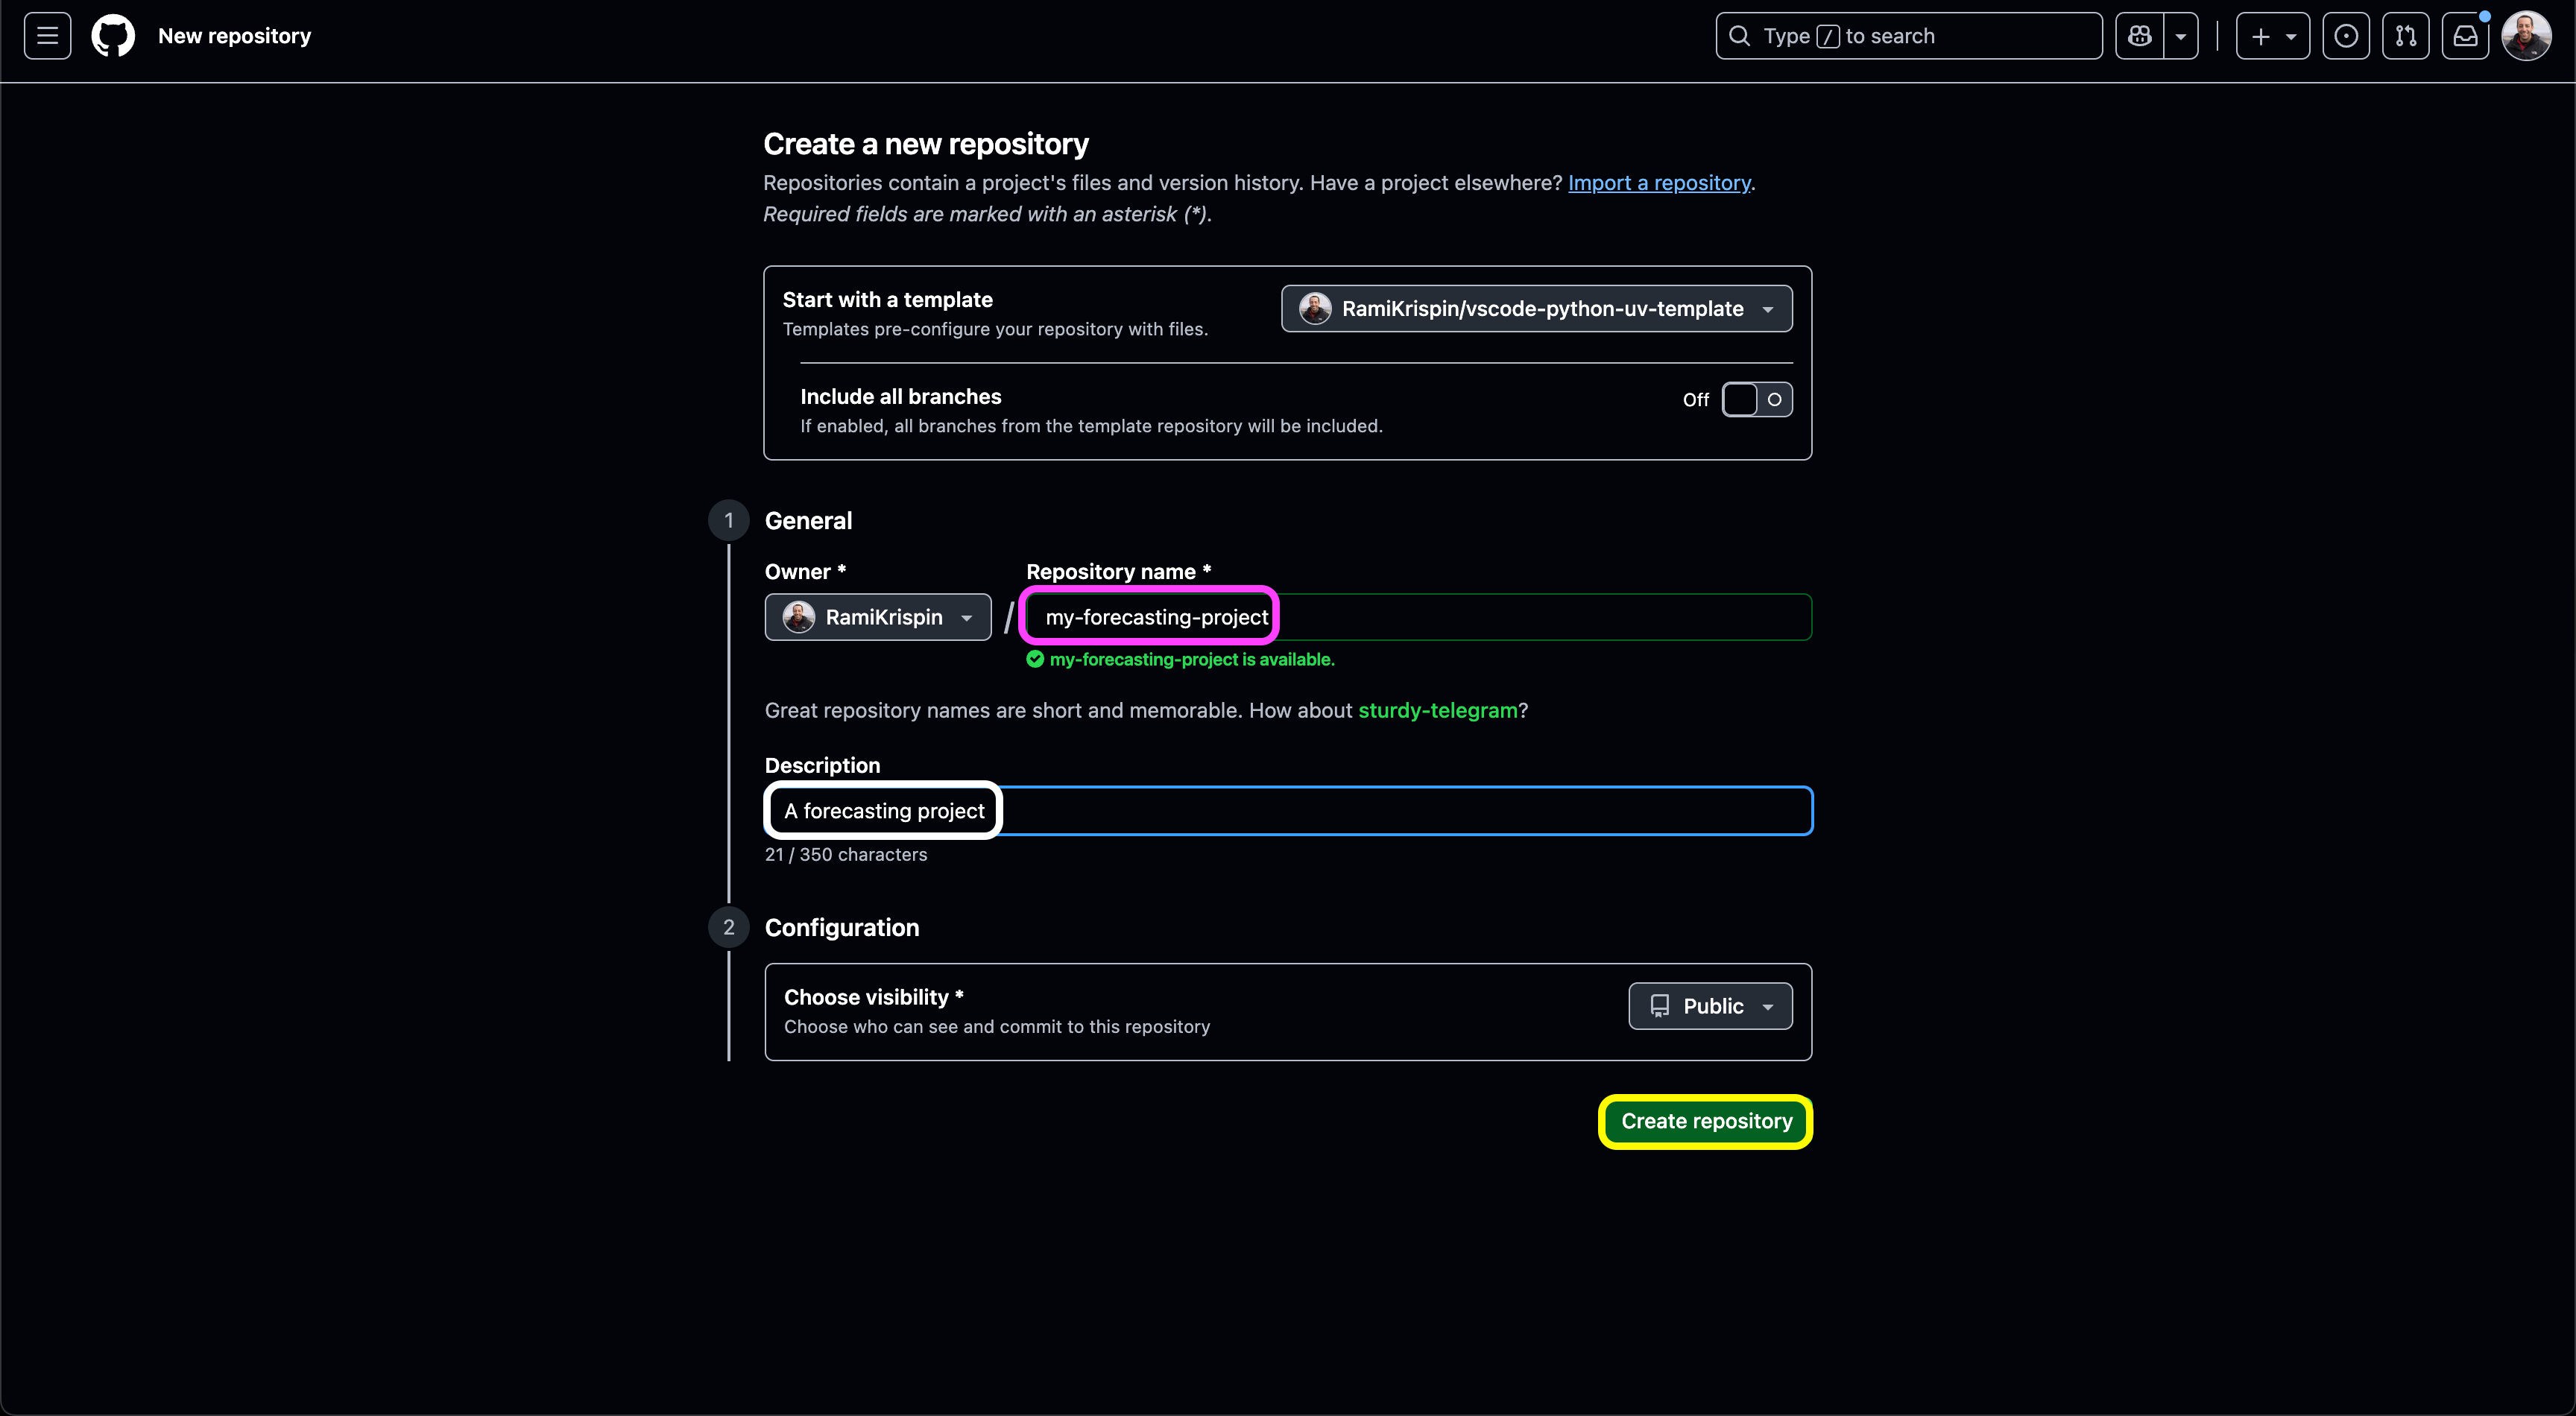
Step I: Fork the template
The first step is to fork the template and create a new repository by using the template the Use this template green button and select the Create a new repository option (see the last screenshot in the above GitHub Template section). This will open the following window, which enables you to set the repository name (marked in purple), set the repository description (white), and create the repository with the Create repository button (yellow):
Next, clone the repository to your local machine:
git clone git@github.com:RamiKrispin/my-forecasting-project.gitStep II: Update the Python Environment Settings
The next step is to modify the container settings according to the project's needs. This includes modifying the following files under the docker folder:
requirements.txt - the list of the project's required Python libraries
build_docker.sh - Optional, a bash script with the Docker build settings, enables you to define:
Python version
Virtual environment name
Image label and tag
We will update the requirements.txt file with the project's required libraries:
wheel==0.40.0
pandas==2.2.2
plotly==5.15.0
plotly-express==0.4.1
ipywidgets==8.1.7
jupyter==1.1.1
narwhals==1.28.0
great_tables==0.16.1
pointblank==0.6.1
statsforecast==2.0.1
mlforecast==1.0.2
lightgbm==4.6.0
xgboost==3.0.2
scikit-learn==1.7.0
mlflow==3.4.0
Update the image tag to 0.0.1, and change the image label to forecast-dev in the build_docker.sh script:
#!/bin/bash

# Image settings
user_name=rkrispin
image_label=forecast-dev
image_tag=0.0.1
quarto_ver="1.7.32"
python_ver=3.11
venv_name="python-$python_ver-dev"
ruff_ver="0.12.0"
dockerfile="Dockerfile"
# Identify the CPU type (M1 vs Intel)
if [[ $(uname -m) ==  "aarch64" ]] ; then
    CPU="arm64"
elif [[ $(uname -m) ==  "arm64" ]] ; then
    CPU="arm64"
else
    CPU="amd64"
fi

tag="$CPU.$image_tag"
image_name="rkrispin/$image_label:$tag"

echo "Build the docker"

docker build . -f $dockerfile \
                --progress=plain \
                --build-arg QUARTO_VER=$quarto_ver \
                --build-arg VENV_NAME=$venv_name \
                --build-arg PYTHON_VER=$python_ver \
                --build-arg RUFF_VER=$ruff_ver \
                -t $image_name

if [[ $? = 0 ]] ; then
echo "Pushing docker..."
docker push $image_name
else
echo "Docker build failed"
fi
Step III: Build the Image
The next step is to execute the build_docker.sh script to build the image from the docker folder:
bash build_image.shThis will rebuild the image with the current project settings. The build time, depending on the caching of the layers, takes between 2 and 5 minutes. This will create the following image:
docker.io/rkrispin/forecast-dev:arm64.0.0.1A note to myself: create a baseline image with all the dependencies (Debian, CLI settings, Quarto, etc.) and start directly from the build of the Python environment. This will reduce the build time to seconds! And yes, I should use buildx :)
Step IV: Update the VSCode Dev Containers Settings:
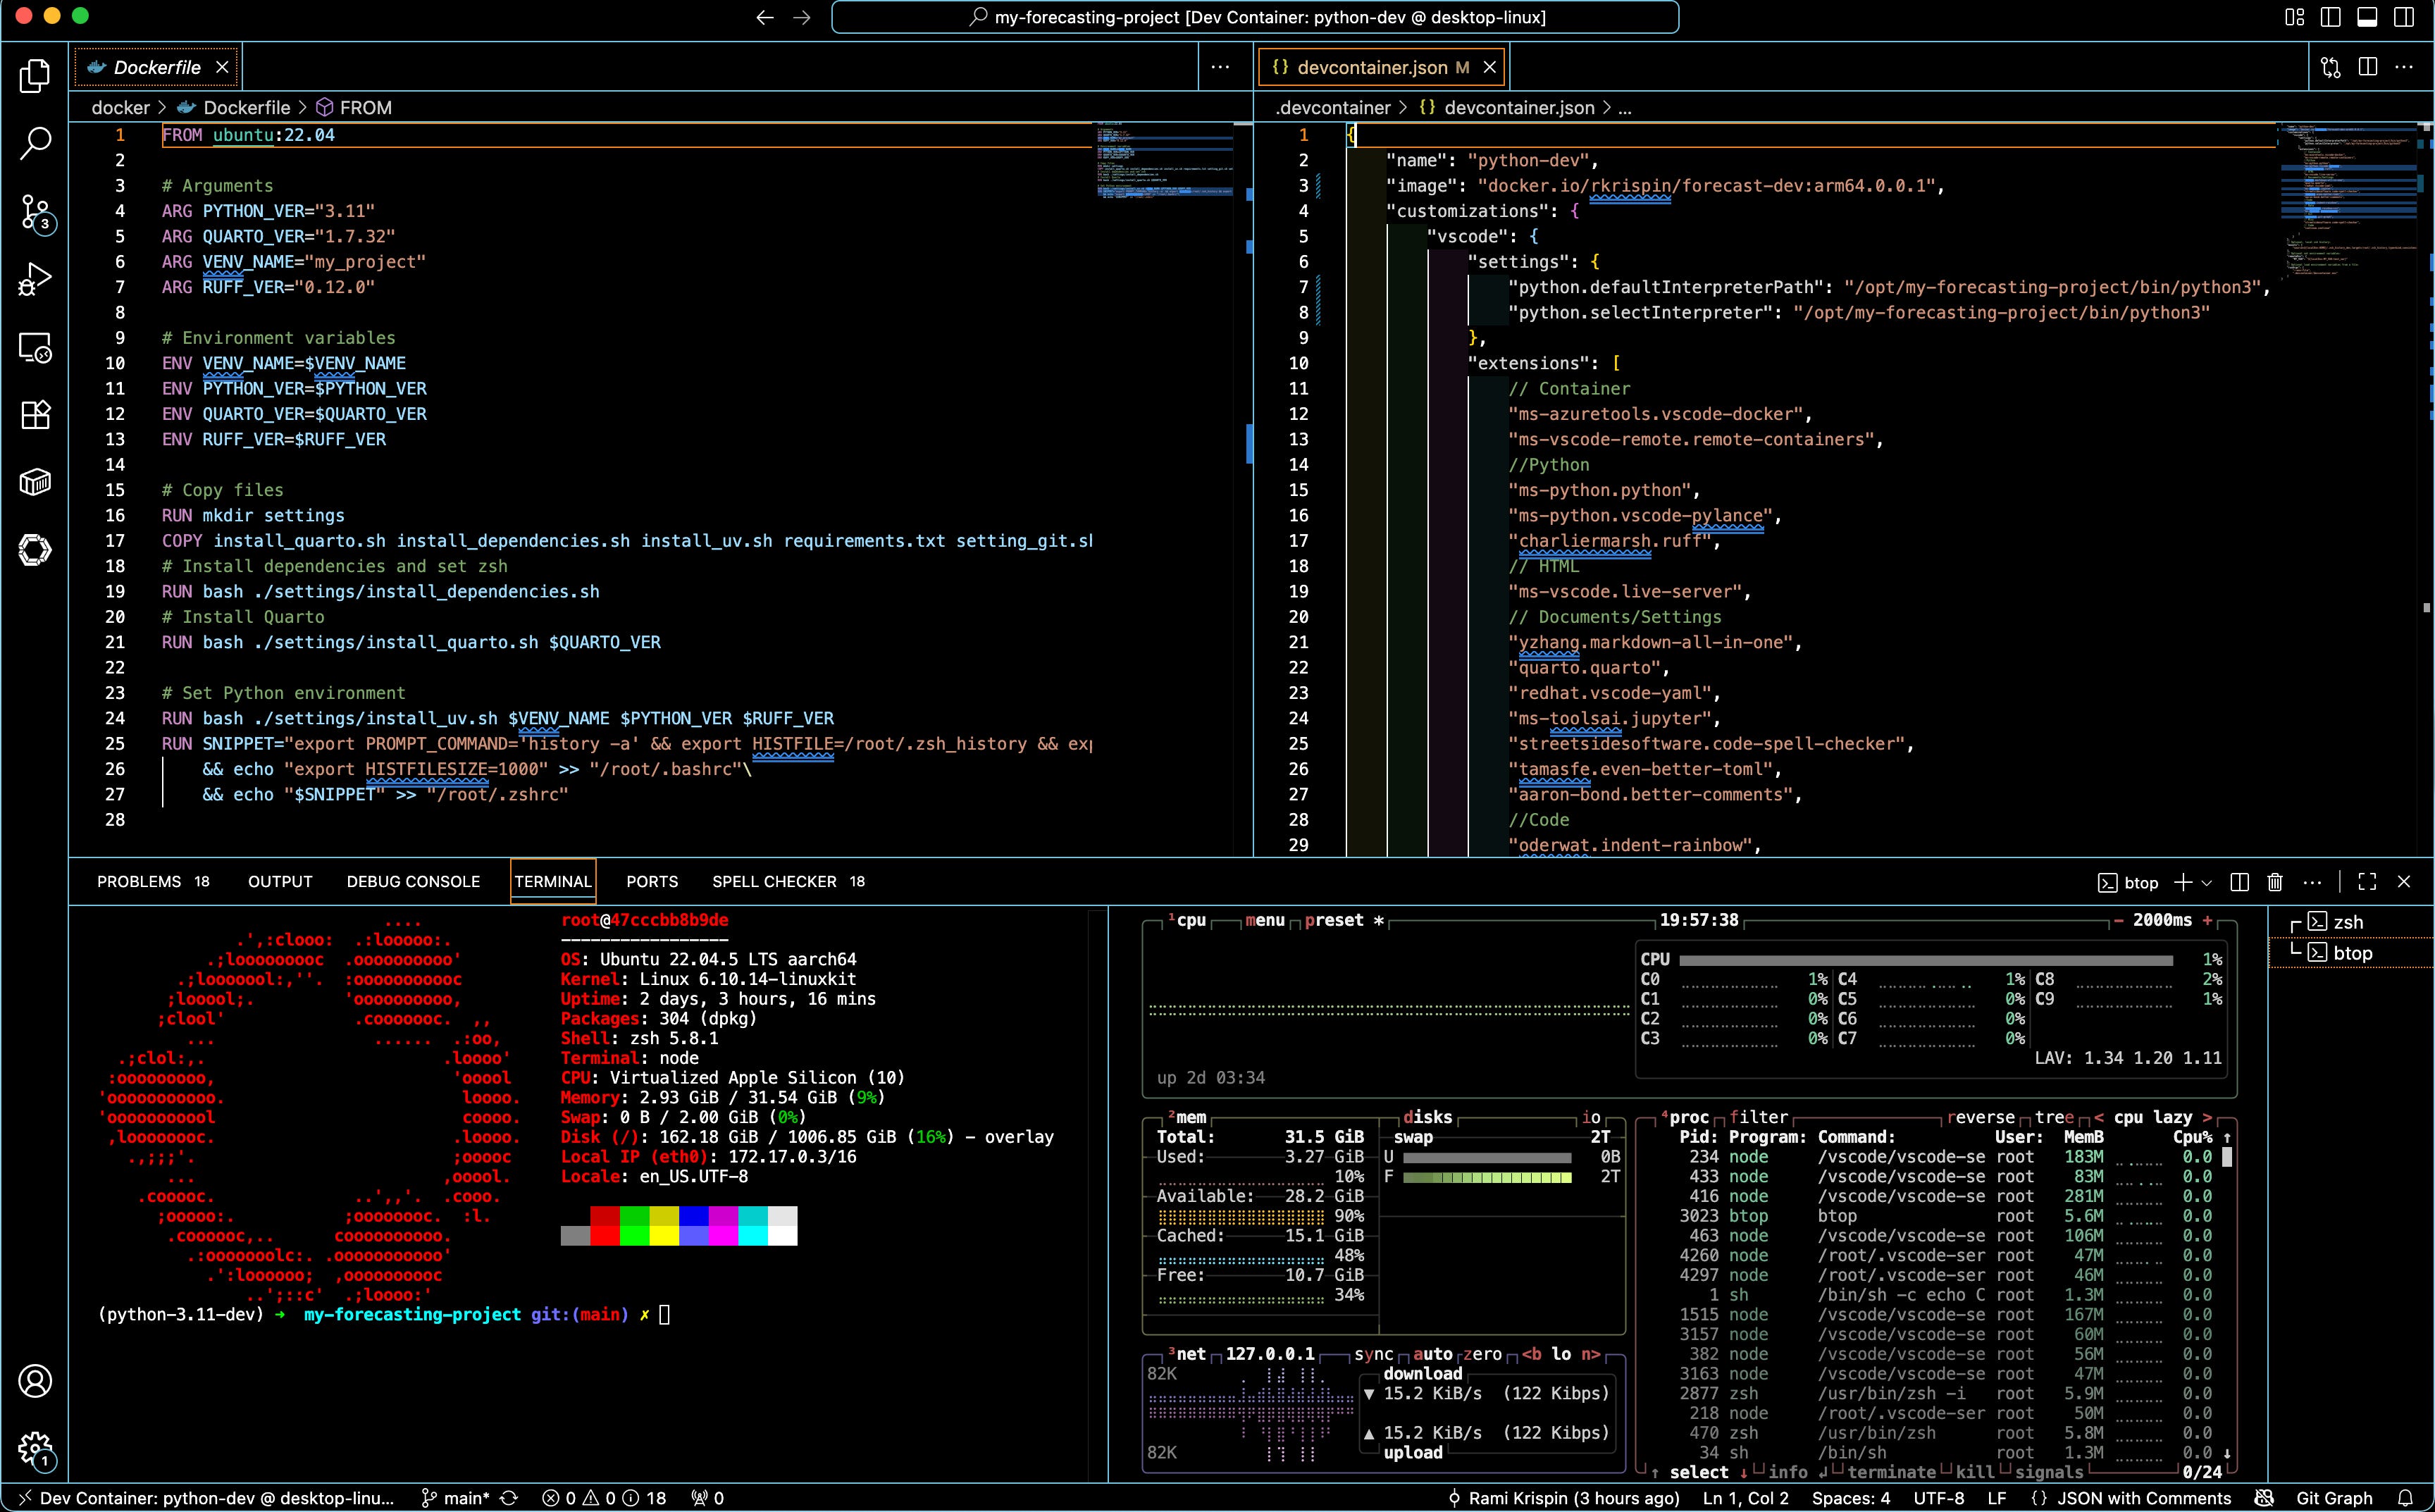
The last step is to update the project Dev Containers extension settings file - devcontainer.json with the new image name and Python virtual environment path:
{
    "name": "python-dev",
    "image": "docker.io/rkrispin/forecast-dev:arm64.0.0.1",
    "customizations": {
        "vscode": {
            "settings": {
                "python.defaultInterpreterPath": "/opt/my-forecasting-project/bin/python3",
                "python.selectInterpreter": "/opt/my-forecasting-project/bin/python3"
            },
            "extensions": [
                // Container
                "ms-azuretools.vscode-docker",
                "ms-vscode-remote.remote-containers",
                //Python
                "ms-python.python",
                "ms-python.vscode-pylance",
                "charliermarsh.ruff",
                // HTML
                "ms-vscode.live-server",
                // Documents/Settings
                "yzhang.markdown-all-in-one",
                "quarto.quarto",
                "redhat.vscode-yaml",
                "ms-toolsai.jupyter",
                "streetsidesoftware.code-spell-checker",
                "tamasfe.even-better-toml",
                "aaron-bond.better-comments",
                //Code
                "oderwat.indent-rainbow",
                // Data
                "mechatroner.rainbow-csv",
                "ms-toolsai.datawrangler",
                // Git
                "mhutchie.git-graph",
                // Misc
                "streetsidesoftware.code-spell-checker",
                // Code
                "continue.continue"

            ]
        }
    },
    // Optional, local zsh history:
    "mounts": [
        "source=${localEnv:HOME}/.zsh_history_dev,target=/root/.zsh_history,type=bind,consistency=cache"
    ],
    // Optional set environment variables:
    "remoteEnv": {
        "MY_VAR": "${localEnv:MY_VAR:test_var}"
    },
    // Optional load environment variables from a file:
    "runArgs": [
        "--env-file",
        ".devcontainer/devcontainer.env"
    ]
}
In addition, you can update the settings with project-specific settings, such as folders to mount, environment variables, extensions to install, etc.
Step V: Launch the Container and Start to Develop!
Now that our environment is set, the last step is to launch the environment inside the container with the Dev Containers extension and start to develop:
The entire process, from forking the template to launch the development environment inside a container, took less than 5 minutes!
Summary
Using templates for repetitive tasks can save valuable time when starting a new project. The GitHub template is a great tool for different use cases when repositories are used as the project code baseline. In this tutorial, we demonstrate how, with a few simple steps, you can leverage a GitHub template to set up a Dockerized development environment. This significantly reduces the starting cost of a new project and enables you to maintain consistency across projects.
Resources
GitHub template documentation
The Dev Containers extension
Example of a Python development environment template
Example of an R development environment template